Category Archives: Cooking

Blueberry sourdough pancakes

blueberry sourdough pancakes

I was in the mood for some pancakes. I also wanted to try a sourdough version. There is quite a bit of discarded sourdough mixture when I go through a couple of feeding cycles. So I searched around for a basic recipe and found this. It seemed that you mix flour, milk, scrambled eggs, melted butter, and baking power together and cook them. I took the sourdough mixture and poured off the hooch (water/alcohol) and then poured the thick spent flour into a bowl. I added one scrambled egg, two tablespoons of melted butter, maybe half a cup of extra flour, and enough milk to bring it to the desired consistency. Turned out great! But maybe I was just hungry…

Chocolate Chipotle self-saucing pudding refined

Well, I keep playing around with my self-saucing pudding recipe. I want to balance the major flavors in this recipe. Right now, there is Molasses, Chocolate, Chipotle, and Beer. I wanted to sneak in some coffee in there as well. So I added three teaspoons of instant expresso coffee grounds. But I couldn’t really taste the coffee. I think that there is a bandwidth problem for taste. You can only fit so many flavors at one time. And the coffee was not intense enough to be seen with the molasses in the picture. I think I am calling this recipe complete at this point.

When I was processing the picture, I noticed quite a bit of difference between a single image and the HDR merged pictures. The single picture is washed out and has a yellowish tint to it.

Continue reading

Chocolate Chipotle self-saucing pudding

Chocolate self-saucing pudding

Okay, I seem to have no willpower against self-saucing puddings. Next up: chocolate. I used this recipe as a base. But, instead of water, I made some changes. Oh yes, indeed, I did. The recipe follows:

I will admit that I was a little bit worried. The pudding part was extremely liquid — almost to the runny batter stage. But, since I have already gone to the effort of making a batch, I carried on.

Continue reading

Mango self-saucing pudding

Mango self-saucing pudding

I came across this recipe for a self-saucing pudding and thought it sounded interesting. The results were disappointing. It was not mangoie enough for me. Perhaps the next time, I should remove the water and use only mango juice (for a total of 1 1/2 cups). And, at the same time, remove the sugar from the sauce. Oh, and some salt too. I don’t know why salt is missing here.

However, when I search for “self-saucing pudding” on google, the first couple of hits are for chocolate puddings. Now those sound more enticing than a second try at mango pudding…

I will say that the whole concept of this recipe seems like a fortuitous mistake. You take a cookie recipe, pour a lot of liquid on it, and then bake it. I would have guessed that the cake part of it would not have survived the boiling liquid. But it did.

Food Strobist Test Shot

Food Strobist Setup

After watching the Strobist Lighting Seminar, I decided to apply one of the lessons to see if it could be done with food photography. Since it was a proof of concept, I just grabbed a can of nuts that was just sitting around. I wanted to have two different lighting tasks. Light only the item on display. Light the background separately. My camera gear for this setup is the following:

  • A – Canon EOS 1D Mark III (manual mode: 1/250th second, f/5.0, ISO 200)
  • B – Canon EF 100mm f/2.8 Macro Lens
  • C – Pocket Wizard MultiMAX (master)
  • D – Pocket Wizard MultiMAX (slave, channel A)
  • E – Canon Speedlite 580EXII (manual, 1/4th power, 14mm zoom)
  • F – LiteDome Q39
  • G – Pocket Wizard MultiMAX (slave, channel B)
  • H – Canon Speedlite 580EX (manual, 1/8th +0.7 power, 50mm zoom) (Roscolux #4790 90 magenta)
  • I – gobo (which stands for go-between) (a punchcard of all things)
  • J – foam-core board with black foam sheets taped to the visible top
  • K – Sekonic L-758DR light meter
Food Strobist Test Shot

And this is the final result! How cool! It is the first time that I have used two different zones of light, the first time I have used a color gel on a flash, and the first time that I have used a gobo to block the light from hitting something (in this case, the can).

Lit with front strobe

Here is how it looks when it is lit only with the front strobe.

Lit with rear strobe

Here is how it looks when it is lit only with the rear strobe.

Using white foam core

By the way, this is how it looks using a white foam core board. Which turned out to be too bright white and not enough magenta.

A second attempt at bread

cake bread

I had another go at experimenting with bread. And ended up with a loaf that looked like a cake!

sponge

I tried taking this picture outside. But the stainless steel bowl was creating a crescent shaped blown out area. So I moved it into the shade. However, the colors were slightly off. There was a bluish tint in the shadows.

clamshell lighting

For the cake bread, I used clamshell lighting. Two light stands pressed as close to the camera and food as possible. At an eight power, I was able to get f/11 at ISO 200. The only weirdness was that one flash was slaved over Canon’s IR. This halved my sync speed from 1/250 to 1/125. I would have thought that I could have at least seen one of the flashes light the picture. Maybe the IR communication parted needed extra time to complete. But the picture was black at 1/250 and lit at 1/125.

Recipe follows:

Continue reading

Sweet Potato + Plantain + Caramel

Sweet Potato Plantain Caramel

Equals good. Different tasting, that’s for sure. I think that the balance is tipped towards the plantain in this equation. So, the next time I will use more sweet potatoes.

I removed the skin of a plantain banana and roasted it in the oven. I also roasted one whole sweet potato until it was a charred and blackened lump. I placed the banana and the scooped out potato into a blender and added some of the left over caramel. And blended it until it was smooth. Or at least I tried that. It seemed like it needed a little bit more liquid to get it blended fully. So I added some of my holiday eggnog (heavy cream, rum, brandy, and whiskey).

It’s been a while since I have made a loaf of bread

loaf of bread

Wow, its been a while since I have made a loaf of bread. I wanted to make a no-knead bread recipe. So I looked around for it in my Cook’s Illustrated magazine. I found the version 2.0 of the recipe in the January/February 2008 issue. But that version uses white vinegar and lager. Which I did not want to use. I wanted it to be a pure sourdough and not a simulated version.

It did start off by mentioning that the 1.0 version used a hydration level of 85%. Which means that, for every 10 units of flour, there are 8.5 units of water. I decided to stop right there with the instructions and see where a pure 85% hydration level would take me. My starter mixture uses 96 grams of flour and 132 grams of water (a whopping 137.5%). I pour the usually discarded starter into a bowl and measure it. It comes out to 207 grams. I then added 300 grams of flour. Next, I needed to figure out how much water to add to bring the resultant hydration down to 85%.

if starter=207g,
then w=207*132/(132+96), f=207*(1-132/(132+96))
then w=120g, f=87g

adding 300g flour, then f=(300+87)=387
water is 85% hydration, then w=387*0.85=329

solving for x,
then w=(x+120)=329
x=209

the final weights would turn out to be: w=(209+120)=329, f=(300+87)=387

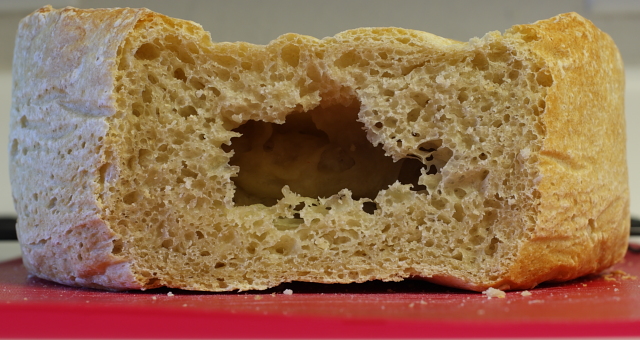
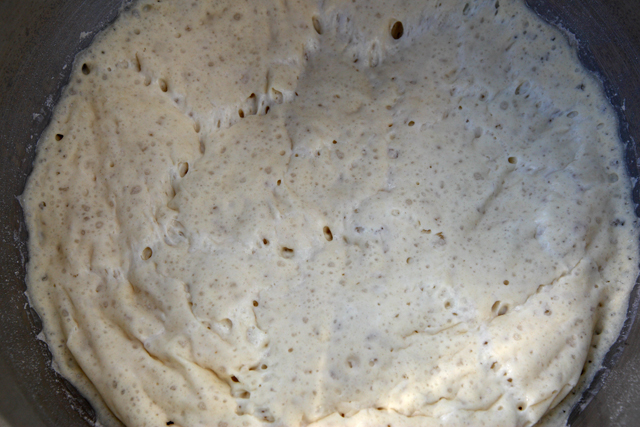
I put the mixture into a bowl and then covered it with saran wrap. I left the bowl in the oven with the light left on for six hours. After that amount of time, it certainly looked like the yeast is active and working. I floured a kitchen table, scraped the dough out on the table, and rolled it out into a ball. However, the dough was incredibly sticky! So I went off script again and kneaded some more flour into the dough. I should have at least recorded how much was used. Next time, for sure. I can only note that the mixture was still sticky — just not incredibly sticky.

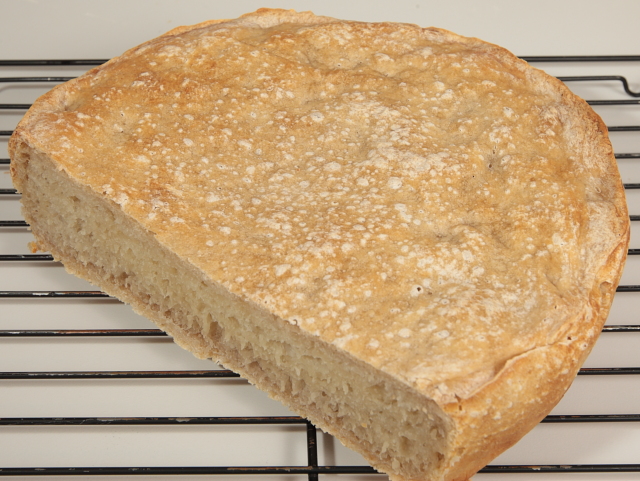
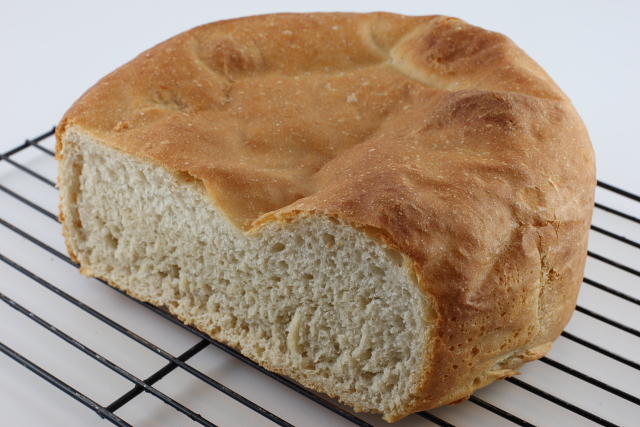
I completely lined my Le Creuset Dutch oven with parchment paper. A cylinder for the sides and a sheet on the bottom. I placed the ball of dough into the Dutch oven and let it rise a second time in the oven. After a couple of hours, I turned the oven on to 450. And after twenty minutes of cooking time, I dumped the loaf out and removed the paper. I put it back into the oven for another 40 minutes (after turning the temperature down to 350 after the bread was nice and brown).

Caramel apples redux

Dipping the apple

I made another batch of apples again. More for the excuse of trying a different style of food photography than anything else. This time I set up a tripod for the camera and used the 100mm macro lens. Behind the camera, I set up a light stand and placed a 580EXII on it. I set its light beam to be focused at 105mm. And, to help contain the light, I wrapped a snoot around it as well. It was set into manual mode at 1/16 -0.3 strength. And it was driven by a Pocket Wizard.

The strength of the output of light was determined by trial and error. My target was f/4.0, 1/250sec, ISO100. At this setting, there is no other light in the picture but the flash. Which is a good thing in my kitchen. It has a smorgasbord of choices: the light above the stove is a yellowish incandescent light, the big light in the kitchen is a varying color fluorescent light, and in the eating area, there is a fan with compact fluorescent lights and dark brown reflective blades.

In my other hand was a TC-80N3 remote controller. Fortunately, my hand was centered enough in the frame. But the auto-focus did seem to concentrate on my fingers instead of the apple.

Looking back

I even took a picture looking back with the G-10. The G-10’s picture is passable. It decided on a shaky f/5.6, 1/2sec, ISO 200. At least it has image stabilization in the body. Using the 580 flash on that camera only lights up the pan. Everything else in the scene is pitch black. Flash lighting has thin depth of field it seems.

Extra Caramel

I made extra caramel as usual. I intend to use it to sweeten some more roasted sweet potatoes…